Showing posts with label sewing. Show all posts

Tuesday, March 27, 2012

Another finish...

I found this list of quilting rules on Pinterest... I did my very best to follow them all, but came very close to breaking #1 on several occasions over the last few days! Straight pins are very dangerous... I bled a lot, but I think I was able to keep it off the quilt :)


Scott, my 9-year-old, has just moved into a room of his own. Up until now, he has shared with his brother. To celebrate Scott's new room, and as a birthday present from me, I made him a quilt. Before I started, I asked him a series of questions...

Do you like dogs or horses?
Do you like rainbows or camouflage?
Do you like boats or cars?
Do you like forests or lighthouses?
Do you like polka dots or plaid?

You get the idea...

He answered the questions, not knowing what I wanted the answers for. But while he was away over Spring Break, I did my best to find some of his choices, in fabric, to use in his quilt.


I cut out 8 1/2" squares and then cut them into triangles and sewed them back together into squares. Each pattern piece had a solid to complete the square... pretty basic, but then I spent a long time getting them in the right order. Gotta say, that part probably took me longer than it should have, and I am glad the kids weren't home because I used the entire living room to organize myself, and they would have wanted to play there!


Quilt front finished and hanging on the blinds. It stayed there for 2 days!!

I finished binding the quilt a few minutes ago, and put it on his bed. He has seen it unfinished and loved it. So yesterday, after school, he painted the artwork shown here, to match the quilt and decorate his room. It is using masking tape and acrylic paint, on stretched canvas. Pretty crafty guy!!


I had asked him to design a quilt the week before, and he did a striped design, which I incorporated on the back of the quilt. Originally, my plan was to quilt-as-I-go on these stripes, but after one trip across the quilt, I realized this was way too big for me to manage on my small machine. So.... I pieced the back in his striped design and then just tied the quilt afterwards. I think it will hold together fine. It has more of a poofy blanket feel, rather than a tightly quilted piece. I guess I have to pay more than $30 at the Sally Ann for my sewing machine if I want to be able to handle quilting blankets that are bigger than a baby blankie!


He also said he wanted his name on the quilt, so I used my Big Shot and alphabet die with some fabric adhesive sheets from SU! and ironed on his name.


Todd said he's next for a quilt!! He wants it in yellow. I think my pin-pricked fingers need a break... or else I need to find a thimble that doesn't make me feel clumsier than I already am!

Monday, March 26, 2012

An Easter dress for Elise

My sweet little girl is quite a character. While some little girls are "girly-girls" she is the epitome of tomboy. I love it! She isn't afraid of dirt, she doesn't mind hand-me-downs and she won't be easily swayed by the latest fashion must-haves. However, we do run into some minor problems on the rare occasion that I really want her to dress up. Take Easter, for instance. It's a good dressing-up sort of occasion. But, Elise thought a pair of school uniform pants would suffice. I decided to put my mommy foot down, and say that, this Easter, she would wear a dress.

Have you heard of Pinterest? It's my new addiction. Well, I typed in a search for "dresses for little girls" on Pinterest and up came hundreds of dresses. Beautiful, elegant, totally-appropriate-for-Easter, kinds of dresses. She liked one. Just ONE! Out of about 300 in total that we looked at, she chose 1. I could have tried to find it in a store, but I just happened to have a metre of the same fabric (green gingham) in my stash, so I thought I would make it instead. The dress I made doesn't look exactly like the one she chose, but it was the same colour, and had no sleeves, so she said she liked it. And she said she would wear it for Easter.

It's not fancy, and as you can see, she has no trouble climbing on fences in it!


Easter isn't here yet, and I've already gotten her to wear it once! Maybe I put both feet down :)

These are a few pictures that I took of Elise in her new Easter dress after church yesterday saying hello to Papa's chickens... you see, this is also the sort of dress that you can run around the grass in, and visit chickens while wearing!


Here's a view of the back - I had a zipper all ready to go, and then I decided that I would rather put 3 cute little ties on the back to hold it closed than fight with a zipper. I've done zippers and they aren't a big problem, but I thought this was cuter.


We were in Victoria picking up our kids who had spent the week with Grammie and Papa for Spring Break. Elise said that if she had to have all these pictures taken, then the boys should be in at least one of them! They happily obliged me, and were so glad they weren't the main focus of my camera that day :)

Thursday, March 01, 2012

Teacher Birthday Present

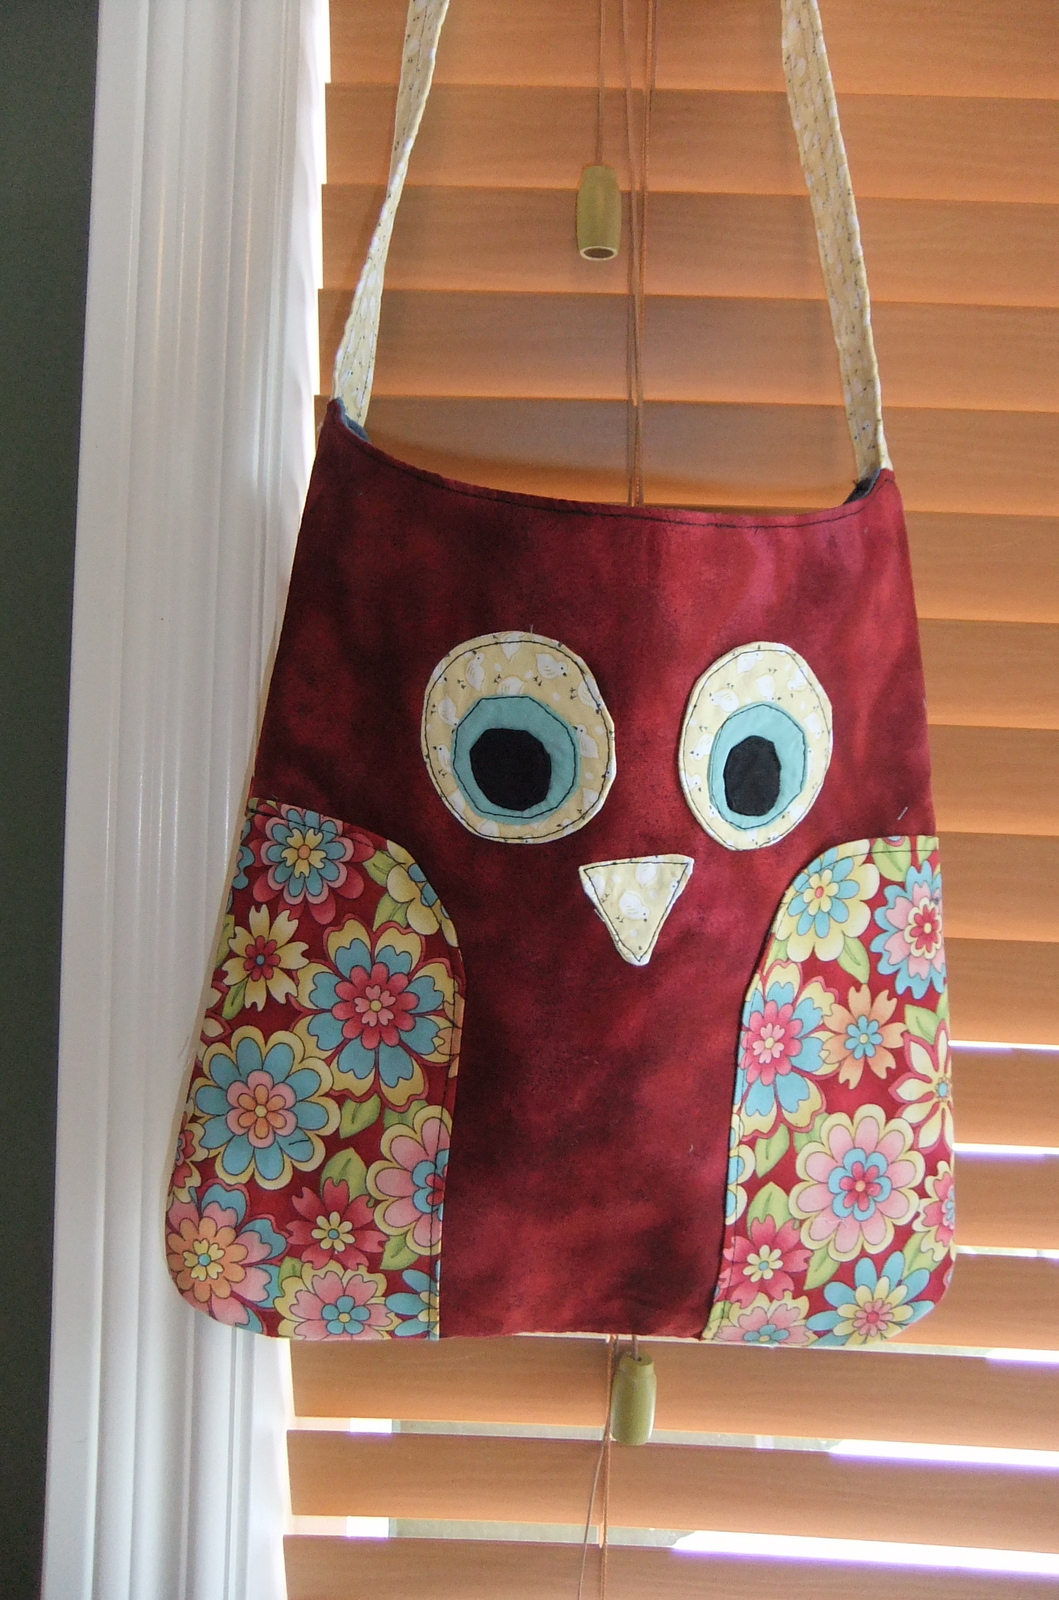
Todd's teacher is celebrating her birthday this weekend, and she has often commented on the bags I make. So, I thought I would make her a teacher-y bag for her special day. I have seen lots of owl patterns around, but I'm not really one to follow a pattern (or a recipe, as my husband likes to point out!) so I drew a quick sketch up last night and then got 'er done! Just put the finishing top stitches on and took a couple pictures. Hope she likes it! I think it will make a cute bag to bring her books to and from school, or carry her marking in. The floral fabric is some of my favourite fabric that I bought a couple years ago to make a different purse called a Phoebe bag. I posted about that project HERE.

Front:


Back... I added a full-width pocket on the back:


Inside... 2 smaller pockets inside:


Sunday, November 06, 2011

A New Blankie!

I wasn't the kind of kid to have a "blankie" but I have one now!! I have been working on this rag quilt for quite awhile. I started it, and then lost interest, then worked on it a bit here and there over the past year. It's not very big, but it's still the biggest quilt I've ever made. It is about 55" square. I planned this to be my movie-watching blanket, and I am heading down to watch a movie right now... can't wait to try it out!


This is how the quilt started. A bunch of paper pieces glued together to make a pattern. I am very scientific when it comes to planning things (totally kidding... I am often called a "winger!" So the fact that I had a pattern, and that it came out relatively close to the original design is really amazing!)


Next, I gathered my fabric and used the scallop square die for my Big Shot and started cutting out fabric pieces. That part is super fun - best way to cut out fabric ever!


It's pretty cozy!


The back... one of the quilters that I follow on Google Reader always pieces her back, and I love that that gave me "permission" to use bits and pieces on the back of my quilt. Next time I'll get a little more creative, but it was hard enough keeping the design on track for the front of the quilt, let alone the back, so it is as it is on the back!


Close up of the rag squares. I have made several bags with this rag technique, but this is the first blanket. Love it... will do it again for sure!

Thursday, August 11, 2011

New Purse

Before I left for Norway, I wanted to make a new purse to take along. It needed to be big enough to fit my camera, wallet, some paperwork (tickets/passport, etc) and a book, as well as a light sweater. It also couldn't be too big, because otherwise I might not be allowed that plus a carry on bag!!

The pattern that I (loosely) used can be seen HERE. I say "loosely" because who am I kidding? I don't think I've ever followed a pattern from start to finish... I guess I get sidetracked, or make a mistake and just try to fix it without having to seam rip... Or I don't cut my fabric quite right, so it ends up being a modification. Another reason I often don't follow patterns is that there are sometimes just too many words to read. I like following the pictures!! But, I have to say I quite like how my bag turned out, and perhaps I should just say I got the idea from this site. My dimensions are totally different, but if you want to make a bag like this, I recommend you follow this gal's pattern because she put a lot of work into the tutorial, and isn't it nice that she shared her pattern, free, online for everyone to enjoy!? Thanks for sharing :)

I got my new goodies from Stampin' Up! just in time before I left, and was able to sew my purse. The SU! fabric, called Timeless Portrait, was almost enough to make the whole purse, but because of the direction of the design in one pattern, I had to add a couple strips of a black I had on hand. So, the following pics are the SU! fabric.


Here's the finished purse....


Monday, June 13, 2011

Bow Bag

While my family was out watching the game tonight, I sat at my sewing machine and finished this bag. I was also watching The Secret Garden, but every 10 minutes, or so, I would run to my computer to check the score. I quickly realized that it is a blessing that Vancouver will have the home ice advantage for game 7.

** Note: if you are in my stampers club, the piano recital that I changed our club night for was moved to tomorrow. Since this only just happened because of the need for game 6, (the teacher figured the turn-out would be low when the Stanley Cup was on the line!) I didn't want to reschedule our club, yet again, to bring it back to the original night. Plus, I was pretty sure that there were at least 2 or 3 of you that would want to be watching the game :) So, we'll meet on the 20th as planned. Thanks for being so flexible! See you next week.

The bag will be a gift for one of my son's grade one teachers. I have to make one more because he has 2 teachers. Not sure if I will do it exactly the same, but I gotta say, I'm pretty proud of how this turned out. There wasn't a pattern, and everything was just eyeballed. I cut straight, of course, because I have a rotary cutter, but the size was by eye. Then, I measured it after it was sewn together so I could make the lining the right size. This bow reminds me of ones my sister and I used to make when we were young. Then we'd put them on hair elastics and wear them in our ponytails. I guess what goes around comes around because they're back in style. And super-duper easy to make, so that was bonus! The bag measures 12.5" X 15", so it's only good for carrying around smallish things, but I figure the teachers could take marking home in them, or bring their lunch to school in these. I'm sure they will find a use for them!


Wednesday, June 08, 2011

More Birdie Blocks

I am behind on my Block of the Month project, but I did recently finish up my April block. The patterns are here, at Little Miss Shabby, and it has been a really fun project to do.

I like the pattern for April, and thought I would keep the eggs on the trees subtle by embroidering them in white, but it ended up being a harsh contrast between that and the dark green. Oh well, I am not doing it over! It is done!

And the four blocks I've completed... I still think the first block I did, with the snowman, is my favourite. I still need to decide on what colour to put as the 2" border around each of the blocks. I think that needs to be a lighter shade. Maybe something along the lines of the beige in there? But I'm still a few months away from that! I am pretty sure that I will back it with denim.

Wednesday, April 27, 2011

Sewing Fun

Like anything, sewing becomes extra fun when you have the right tools and fabrics. I just stumbled across this fabric site in the US. Love, love LOVE some of these patterns.

SkyeReve Fabrics on Facebook

SkyeReve Fabrics website

Monday, April 04, 2011

Elise's Designing Debut!

This afternoon, I wanted to work on my Block of the Month Quilt... but Elise wanted to watch me sew. That gave me an idea! Over the last few months, I have been given, from several people, many quilt squares, and quilting fabric - much of it "vintage!" There are squares cut at 2", 4", 8", as well as triangles, and pieces to make bow tie squares. Where do I begin?!!!

I took a small box of squares and told Elise to arrange them in a pattern, or a design, or basically however she felt like it! This is what she came up with. After a few rows, I knew this would make a cute pillow case. So... here you go - my 4-year-old's first design with fabric!

As fast as she put the squares together in her design, I sewed them, until we had 14 rows long by 10 rows wide. Then I added some gingham on the open end, and sewed it to the back of the case.

She chose this kitty cat fabric for the back... I didn't feel like sewing more little 2" squares to make the backside of the pillowcase, too!

Already enjoying her pillow, while watching a movie this evening! And, while this might not be a "design" that anyone else cares to duplicate.... she was so proud to show her creative design to the boys when they came home from school.

Thursday, March 10, 2011

Blessed by Friends

As I posted a couple days ago, I hosted a stitching party here on Monday. I wanted to share the hostess gifts that I got.

Rhonda gave me these beautiful tulips - and they have opened up even more since I took this picture. Wrapped around the tulips, and then tied with a bow, were these fun pieces of fabric shown in the second picture! Thanks, Rhonda!!


And for several months now, I have admired these adorable strawberries that you will see as decoration on Kim's Etsy page. I've commented on them to her, and now I have a pair of my own!!! I love them - thanks, Kim!!

Wednesday, March 09, 2011

Ironing Board Makeover

I've had my ironing board for awhile now... For at least 12 years... I can't remember if it was a purchase of my own or if I got it as a hand-me-down when I moved out back in '99.

I have since learned that I should not use tap water in my iron. Look what a mess it made (over time) on my old cover:

From now on, I will only use filtered water in my iron.

I did a Google search a few days ago and found this super simple tutorial on how to cover your ironing board without replacing the cord. That sounded like something I could handle!! After going through my stacks of fabric, I concluded that for a large iron, you will need more than one metre. I had to cut it on the diagonal, and add an inch on each end to make it long enough. (but that part gets hidden, anyway).

I came across this black and white sewing themed fabric that I bought a few months ago. Right away I knew it was perfect for this project!!!

Happy sewing... and ironing :)

Tuesday, March 08, 2011

Birdie Blocks

I have been doing a "block of the month" project, along with a few friends. Last night, we had a little stitching party at my house to work on the March block.

The pattern is free online from this site: Little Miss Shabby

I am now caught up to date with my Jan, Feb, March blocks. I just took fabric from my stash. I have so many other things on the go, so I didn't want to buy more fabric for another new project... I told myself that if I could find enough suitable fabric in my bins then this project would be a "go!" If not, I would pass.

I don't know where the finished quilt will go. Depends on how large I finish it. The pattern calls for it to be 52X66 when complete. This link will give you an idea of the finished project: Birdie Stitches Layout.

January


February


March
Since the March block wasn't my absolute favourite.... I borrowed Kim's sketch with a cleaner rainbow, adding a shamrock, and using the January birdie (because he's fluffier!). Thanks, Kim! I added the little shamrock to his chest and did 3 lines of stem stitching to pull in more green.


Sunday, February 13, 2011

Sweet Little Girl

I have been so inspired lately by my sewing friends. Here's a little pillow cover that I did this week. I love love love this fabric. It's from the new Occasions Mini from Stampin' Up! called Sweet Stitches and I think it is just darling. I added the image of the girl from the orange fabric to the center of the this block, and it will adorn a pillow once I get it all finished with the back half (the back will likely be the solid blue fabric).